Ostrich Sosaties

Ostrich Sosaties

Sosaties are a traditional South African dish of meat (usually lamb or mutton) cooked on skewers. The term derives from sate (“skewered meat”) and saus (spicy sauce). It is of Cape Malay origin, used in Afrikaans, the primary language of the Cape Malays, and the word has gained greater circulation in South Africa. Marinated, cubed meat (usually lamb) is skewered and barbecued shish-kebab style.

So the task was set by Mediterranean Delicacies to create a locally inspired dish using their range of amazing products. You can go have a look at their website to see the full range. Given that South Africa has become this melting pot of diversity and culture, I had the option to go many ways. I could of gone very Cape Malay and made an amazing curry, or very retro and stuck to making stunning canapes and snacks, but nothing screams South Africa, like Braai…we even have a day set aside for it each year, it’s a staple in most households, and every one claims to do it best. The #AfroChic element to this, is that it’s a different take on “meat on a stick”, served with a gorgeous cous cous salad and bursting with flavor.

Processed with VSCO with e1 preset

Processed with VSCO with e1 preset

Using these four products from the range, two as a marinade, one as a dipping sauce and the other as part of the salad, you really don’t need loads of prep-time, its easy to pick up on your way home from work, or even to add to the trolley over the weekend, because you can find the range in allocated fridges in most supermarkets, including Pick ‘n Pay, Checkers and Spar.

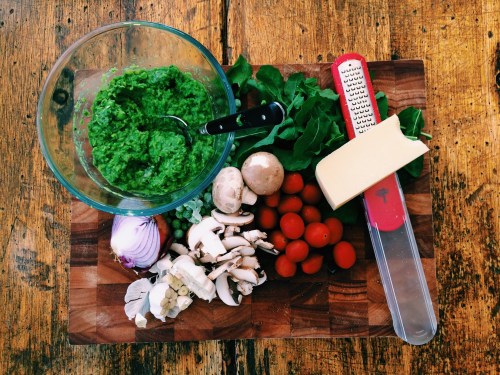
The key element to making this a success is the marinade. You’ll have the earthy punch of coriander pesto, with the spicy kick of the chilli and garlic relish. Make the mix and generously coat your ostrich pieces, leaving it covered in the fridge for about 2 hours. (If you are pressed for time, half and hour would be cool, but have patience….make it amazing)


The cous cous salad can be made with rice, Bulgar wheat, or even pasta, but the addition of cous cous to this recipe makes it simple and easy!

Ok, so here is the run down.

  • Scroll to the end of this post and print the recipe
  • Go get all your ingredients
  • Light your fire, or grill.
  • Do your preparation
  • Put someone on Sosatie duty
  • Watch as your family and friends devour your yummy food!

Also, tag @medideli on social media so that they can see what you are making and creating with their awesome range!

Ostrich Sosaties

  • Servings: 7-8 sticks
  • Print

For the Sosaties

  • 500g of Ostrich cut into cubes
  • 2 TBSP of Coriander pesto
  • 2 tsp of Chilli and Garlic Relish
  • Salt and Pepper
  • Olive oil
  • Sosatie/Kebab sticks (if you are using wooden ones, soak them in water for half an hour, this prevents them burning on the flames)

For the salad

  • 2 cups of cooked Cous Cous (follow instructions on the box)
  • 1 jar of the Artichoke Salad, chopped
  • a handful of soft herbs, chopped (I used coriander and parsley)
  • 1 cup of baby roma tomatoes, cut
  • Salt and Pepper
  • Olive oil

To Serve

  • 1 tub of tzatziki
  • lemon wedges
  • extra coriander to garnish
  1. In a bowl, add your ostrich, and marinade mix, and season well with salt and pepper, as said before, leave aside to soak up all the yumminess. Once you’ve allowed marinading to happen, skewer the meat onto your prepared sticks and set aside.
  2. In a separate bowl, add your cous cous, chopped artichoke salad, herbs, tomatoes and season well, with salt and pepper, and copious amounts of Olive oil.
  3. Once your fire/grill is ready, brush the sosaties with olive oil, and place them onto the grill. I gave mine about 5 minutes of the first side and then 3 once i flipped them, giving me the perfect medium.
  4. Prepare a big board or platter, layering your cous cous salad and topping them with the grilled Sosaties, topping those with tzatziki and fresh coriander stalks.
  5. Squeeze fresh lemon juice over all of this amazingness and serve immediately.


Sosatie Defintion from Wikipedia


Kelp me out? 

Kelp me out? 


I feel like I could forever be writing about how good hemp, kelp, Kale and cashews are for you. 

I’m not a doctor and don’t have any type of qualification to allow me to preach about health benefits, but I am a chef and I am a human being and I can “feel” the goodness that my internal organs jump up and down with when I eat, drink and generally digest these food items. 

When I see something I like or taste something that gives my mouth a slight “foodgasm” I always tend to say “This (fill in the blank) though!” – so wether it be a “man” an “ice cream” or a “spring roll”, those are generally the next words out of my mouth. 

Ok. So…This sauce though!!!!! 

Man oh man oh man! 

It’s rich, thick, decedent and sooooooooo good for you, that you will actually make it in bulk and keep it in the fridge. It’s like my Kale pesto that’s always around, this green sauce and I are destined to have a long and very eventful relationship.

Algae and green hemp dressing/sauce

Ingredients 

1 cup of warm water 

1/2 cup of hemp seeds 

1 cup of cashews 

3 whole garlic cloves 

Juice of 1 lemon 

2 TBSP hemp oil 

1 TBSP protein powder 

1 tbsp spirulina 

1 tbsp of kelp powder 

2 tbsp of rock salt 

Method 

BLEND! (How easy???) 

The best part of this finished product is that it can be drizzled over everything from chicken to fish, salads to roasted vegetables and it’s an even better accompaniment to chopped Kale that’s bound for the dehydrator for Kale chips! 

Heaven? This sauce though! 

❤️🍴

Cashew magic! 

Cashew magic! 


These little bites of amazingness happened in 15 minutes and have an entire amount of 4 ingredients! Four………four!!!!!!! 

Talk about easy and quick snacks that remain rich in nutrients and are yummy and tasty and creamy and nutty and sweet!

I grew up in a house of snackers. We still do snack like crazy, and the saltier the better, cashew nuts reigned supreme in the nut snacking department, and they were covered in peri-peri or salt, or also as a sweet variety, in thick golden hard caramel. (Deeeeeeeelicious) 

But onto healthier trends and options…raw cashews are packed with energy, antioxidants, minerals and vitamins, so in other words, a superseed with superseed powers to make you a superhuman! 

This recipe is quick, easy and, like I’ve said, it has four ingredients. 

Ingredients 

2 cups of cashews 

12 large dates, pitted

1 cup of dried strawberries

2 tablespoons of vanilla extract 

Method

In a food processors, add the cashews. 

Pulse until fairly “chopped” up. 

Now add the dates, one by one and keep the processor running, just work slowly, as the dates are tricky to get blended if you add then all at the same time. Now repeat the process with the strawberries. You will land up with a sticky crumbly cookie texture. Add the vanilla and give it one more mix. 

Shape into little bite size balls with your hands and store in the fridge. 

You could add about a 1/4 cup of coconut oil if you want, but I find that these are yummy and keep their shape really well. 

They really do taste like raw shortbread cookie mix, which is a major bonus as these are made without any processed product!!!!! BONUS! 

❤️🍴


I’ve been converted! 

I’ve been converted! 

HEALTHY PANCAKES/CRUMPETS!!!!!  WHAT!!!!!!!!!!????????? This is absolutely everything to me! Oooooooooooooooooooh my gooooooodness!!!!! 

Did I jump into this craze late? Possibly!!

How is it that for less than five ingredients, I made the most amazing, fluffiest, healthy, no processed carb situation pancakes this morning?? I’m blown away! See this is what I was talking about yesterday, recipes that make me go WOW!!!!!!!

Did I mention that it is also incredibly easy to make????????????

Protein Crumpets

  • Servings: 6-8 crumpets
  • Difficulty: easy peasy
  • Print

Ingredients

Enough for about 8 to 10 pancakes/crumpets

4 eggs whites

1 cup of gluten free oats

1 banana

2 teaspoons of vanilla

1 tsp of cinnamon

Go wild with garnishes and what you serve it with! Fresh fruit is always a winner.

Take all the ingredients – blend.

Fry in a non stick pan.

Flip

Eat!!!!!!!!!!!!!!!

❤️🍴

Universal foods 

Universal foods 


Pizza and pasta, potatoes and pastry. Why do they all start in a “P” ? Let’s not forget cheese, maybe donuts and cake! 

All these are generally, now a days, not on the top of the “you may eat as much of this as you want” list. (That’s a pity)

Lactose intolerance, gluten free me and all the other food problems we sit with because of overtly processed food is actually such a downer! 

I’m lactose intolerant. My favorite thing in the entire world is cheese sauce!! On toast, grilled,  all over pasta, and over chicken, all over anything. But alas, I cannot and shouldn’t be putting cheese or milk or cream anywhere near my face! 

Luckily I can get my hands on lactose free yoghurt, I also eat Parmesan, as its a hard cheese and less processed and I try to only eat pizza like once a month! 

Ok….I’m rambling…I found a recipe by Melinda Novak, she has a blog at www.cookingalamel.com, for a Creamy Greek Yoghurt Mac and cheese. 

I’ve tweaked the recipe a bit to suit me. 

Ingredients 

2 cups of macaroni – gluten free or not (raw) 

1 cup of mature cheddar (grated)

1/2 cup of Parmesan (grated) 

1/2 cup of lactose free yogurt or Greek yoghurt 

1 garlic clove finely chopped 

Salt and pepper to taste 

Method 

Cook the pasta until al dente.

Before you strain your pasta, remove 1 cup of the water, and keep to one side. 

In the same pot that you’ve cooked the pasta, add the garlic and stir about to release the oils and to start cooking it. 

Pop the pasta back into the pot, with half a cup of the water. Add the cheese and stir until it melts. 

Pour in the yogurt while you continue to stir the pasta. Season with salt and pepper. 

If it starts getting toooo thick, pop in the remaining water. 


You are faced with an extremely creamy and cheesy Mac’n Cheese…which is slightly healthier than the white sauce based alternate! 

❤️🍴

Raw moments…again! 

Raw moments…again! 


Aaaaah! Obsessed with the raw food situation?? 

These are snacky bite size nuggets, packed with loads of amazing seeds…chia (WE LOVE CHIA), hemp seeds, dates, raw cacao…oats!!!!!!! Cooooooome on, they are delicious 😉 

Before I get to the really REALLY easy recipe, let’s focus on Hemp. 

This ancient food can be traced back thousands of years to Chinese, Egyptian, Persian and other cultures, where it was revered as a complete food source. At 35% protien content, shelled hemp seeds are the answer for anyone lookin for a raw, vegan or organic complete protein source. They also contain a wide array of nutrients, antioxidants and fiber. Hemp has been long overlooked as a superfood for its misunderstood association with marijuana. Hemp seeds do not contain THC.   


Ok! Now that we are all a bit more educated, onto the recipe. 

Ingredients 

100g dates, pitted 

4 TBSP of boiling water 

160g of gluten free oats or rice flakes or quinoa flakes 

40g raw hemp seeds 

35g chia 

3 TBSP of melted coconut oil 

2 TBSP raw cacao powder 

2 TBSP rice syrup 

In a food processor, blend the dates and hot water until it’s thick and sticky. 

In a bowl, mix the oat/flakes, hemp, chia, coconut, cacao, rice syrup 

Add the date mix and combine all ingredients until thoroughly coated. 


Shape into balls in your hands, or if you want to cut into bars, double the recipe and set into a lined baking tray. Leave in the fridge for 1 hour and cut into bars. 

Wether balls or bars, they can be kept in the refrigerator, covered, for up to two weeks. 


❤️🍴

Balls of energy! 

Balls of energy! 


Everyone needs a boost now and then. We all on a major mission called LIFE. Most days it wins at kicking our backsides, other days we rule the race. But any bit of help is welcomed and if they are in the form of small delicious bite size pleasures, then why deprive yourself? 

Ingredients 

2 cup of chopped dates 

1/2 cup of honey 

1 TBSP of Chia seeds 

1 TBSP of flax seeds 

A pinch of salt 

1 1/2 cup of gluten free oats 

1 cup of crushed almonds 

1 cup of cranberries 

1/3 cup of raw cacao nibs

Combine the dates, honey, chia, flax and salt in a food processor, it takes a bit of time to mix up, but leave it running and soon it blends to a delicious gooey paste.

Mix the oats, nuts and cranberries with the cacao in a seperate bowl. 

Add the wet to the dry. 


Roll up your sleeves and mix. It’s becomes messy, but what helps is that you can pick your fingers after. BONUS. 

Ok….now leave to “settle” for about 15 minutes. 


Keep a little bowl of water on hand to dampen your palms, it helps when shaping the balls. 

And shape! 

Ok. 

So, you can leave them raw, or you can bake them. I find if you bake them, you can keep them in an airtight container for 2 weeks, if you keep them raw, you have to keep them refrigerated, but in both cases they last that long (if you don’t eat them before). 

If you bake, set oven to 180C, bake for 10 minutes, leave to cool before you store them! 


❤️🍴 


Bananas in pajamas 

Bananas in pajamas 


Remember that cartoon that used to come on TV? “Bananas in pajamas are coming down the stairs, bananas in pajamas will catch you unawares” or something like that….well, those were the only bananas I liked, and even till today, it’s the one fruit that I cannot stand. Although…….put it in bread, and I’m like “hold me back”

Banana bread. Gluten free banana bread. 

Banana bread. Really good gluten free banana bread. 

Banana bread. Make this recipe. 

Ingredients

2 cups of gluten free baking flour 

1 tsp baking powder 

1/2 tsp salt 

1/2 cup of butter cubed

1/2 cup of brown sugar 

3 TSP of honey or golden syrup 

6 ripe bananas mashed 

2 tsp of vanilla essence 

Method

Preheat oven to 175C 

Lightly grease two small loaf tins or a 1kg tin 

In a large bowl, combine dry ingredients. 

In a mixer cream together the butter and sugar, slowly add eggs, syrup and mashed bananas

Add the banana mixture to the flour mix and combine 

Pour battered into prepared pan 

Bake for 30-45 minutes or until a toothpick comes out clean 

Serve warm with lashings of butter or a honeyed whipped cream! 

❤️🍴


Finding inspiration 

Finding inspiration 

As a chef, I am always drawing inspiration from other blogs, recipe books, Pinterest or Instagram.

Today, two of my new favorite recipes come from two different sources. 

Chris from @talesofakitchen on Instagram makes raw and cooked foods that are vegan, dairy free, processed sugar free and as she puts it “full of awesome” – her website talesofakitchen.com , is filled with loads of amazing recipes that are quick and easy and pack a major nutritional punch! I made her “Grown up dark chocolate quinoa cookies” today (top photo), they are ridiculously easy and filled with awesome ingredients. 

The second source, Natasha Corrett. 

If you know my blog, you have probably noticed that I have used or adapted her recipes before, and they have yet to disappoint. 

I made her broccoli and lentil burger patties, but I added tofu to my recipe for that extra bit of protein power! (Pictured below) 


Grown up dark chocolate quinoa cookies 

1 cup of quinoa flakes 

1/3 cup ground linseed (I actually used the whole seed as I couldn’t  find ground) 

1/3 cup crushed almonds 

1 banana, mashed 

3 TBSP cacao nibs 

1 tsp cinnamon 

2 TBSP of honey, maple syrup or a sweetener of your choice 

1. Preheat oven to 170C and line a tray with baking paper 

2. Combine all ingredients in a bowl until you get a sticky dough. 

3. Roll into balls (I got 12) 

4. Bake them for about 20 minutes or until golden brown. 

DONE! 

❤️🍴 

instagram.com/foodbyjill

Cauliflower power! 

Cauliflower power! 

Soooooo, we on this trend of being healthy! Eating less processed carbohydrates, or just less processed items in general! 

I love the cauliflower pizza base idea! It packs an amazing flavour punch and is obviously much healthier (just don’t over dose with cheese) 

Recipe below! 

Ingredients for the base:

1 cup of cauliflower (finely chopped in a food processor or grated) 

1/2 cup of low fat grated mozzarella 

5 tablespoons of almond flour 

3 tablespoons of grated Parmesan 

1 teaspoon of chopped mixed herbs (any that you prefer) I use oregano 

1 pinch of salt and pepper 

1 egg beaten 

Toppings 

GO WILD! 

Set your oven to 200 degrees celcius 

Mix the base ingredients in a bowl, shape into a circle or spread out onto a prepared baking tray and pop into the oven for about 15 minutes or until golden brown! 

I use a basic tomato sauce for the base 

Top with your choosen ingredients and pop back into the oven to melt 

I don’t pile the pizza with toppings, bearing in mind that the cauliflower doesn’t “harden” like a normal pizza base! 

So that’s that! 

Be creative and enjoy the process! 

It’s ridiculously yummy! 🍴❤️